THE BOX

THE BOX, you either love it or you hate it! Then again there are those of us that just don’t really care 😉

If you haven’t figured it out we are talking about Instagram. Arguably the most popular photo sharing social media site out there. Started in mmnnmnm (What Anne means is “October 2010” – K) and now owned by the Big Blue Giant FB the box hasn’t changed.

I use instagram…. >.>…. sometimes. My screen name is Chimera_Refelections. I usually don’t post a lot of mobile photography per say as much as I take my camera shots and crop them to fit the box. I also hate trying to hashtag all my photos.

I happen to use G+ for a lot of my mobile shots now. Even before it changed owners I wasn’t a big user and after well…. I felt much less likely to use it. From my previous trip I posted a few shots of Fu but other than that I haven’t done much. In all honesty if I used it more it would probably be pics of my daily life (which I assume is what its supposed to be) and my dog.

View this post on Instagram

Her first ocean wave~

A post shared by Anne (@_chim3ric) on

Being the stupid perfectionist that I tend to be when it comes to my photography I don’t like posting half thought out shots and thats what most of my mobile shots are. My bf on the other hand is an instagram pro, his screen name is shirokodogg  and he spends HOURS and HOURS (small exaggeration……not really pretty sure he spent an hr on some of those photos) getting that perfect instagram shot. He works from within the box to begin with and doesn’t crop. I on the other hand can’t spend that much time doing so with my phone. I like being able to enjoy the moments as the come rather than record them as they go.  Especially if I didn’t bring my big camera for just that reason. I am one of those people who get upset, well FURIOUS, at those people who can’t put their phone down and just enjoy dinner or the park or wherever we are. Also I hate it when my phone dies and the camera and auto-upload with G+ are two things that drain my battery!

I, on the other hand, use Instagram quite a bit.  You can find me as kwaterloo.  As per my previous post, I use it more to share moments in my life with my friends and family.  I do equal parts bringing a photo in to Instagram and simply using the camera feature within Instagram.  It depends on how quickly I want to get the shot.  And I don’t typically spend a whole lot of time perfecting a photo.  I worry less about “does this photo look amazing?” and more about “will this photo remind me of the experience I was having at the time?”  

http://instagram.com/p/cQBtYUkFCq/

I was very hesitant of using Instagram at first, but once I took those first steps, I broke out into a run into the Instagram craze.  I don’t have it linked to my Facebook or my Twitter.  I have more friends on Facebook and don’t necessarily want to flood their news feeds with pictures of my cats (read: they would not enjoy being flooded with pictures of my cats).  

http://instagram.com/p/YL-1VJEFMD/

http://instagram.com/p/drpE70EFJo/

But I am considering connecting it to my Twitter, just for shits and giggles.  I feel like Twitter would appreciate my cat pics more than Facebook would.  I tend to be one of those people that’s always on my phone.  But I think that has more to do with the fact that I’ve had a smartphone for less than a year and am still mesmerized by the whole experience.  If I am at dinner or out somewhere with a friend, what I usually do is snap a quick picture and deal with Instagram later.  That way I get to capture the moment and enjoy it!  
Daytrippin Bag, What do I carry?

This is sorta a what’s in my bag but not really as this is more specific for traveling all in one bag. Much harder than it sounds! Especially as a woman! So its more of a what you SHOULD have in your bag for day trips! (photos in this post were taken with the HTC One)

I recently just took a 3 day adventure with

http://www.Centrair.Jp/en/japantravel/
http://Go-centraljapan.Jp/en/
https://www.facebook.com/Centraljapan.Jp and https://www.facebook.com/japantravel.nagoya?refid=17

You can check out my photos on my FB or G+(Anne Vornbrock) as I am in the process of uploading them.


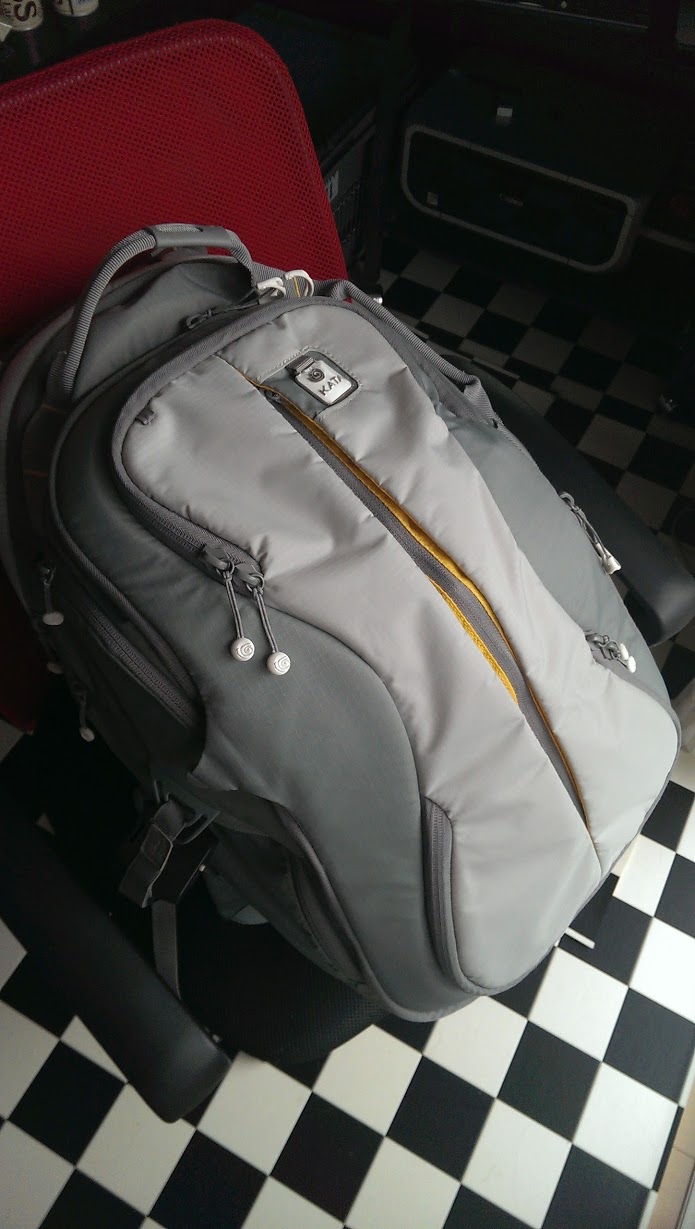
Here in Japan a lot of travel is done by train and bus so you are a little limited space wise. You shouldn’t have something that is too bulky or too big  or awkward you know just something would become a concern to others. For my 3 day adventure I decided to break in my new bag!! it was the first trip with this monster and I am ever so happy I decided to get it. Well thats not true, it was a gift for our 2yr anniversary from the BF, but all the same I am happy I insisted on this one! And even happier it was on sale when we bought it and IT WAS THE LAST ONE! So I am sincerely thankful to whatever photo deities were watching out for me on that day. I have a Kata Bumblebee 222-UL.kata


The bag is gorgeous in my opinion and fits my needs. Of course there are a few things I would change but I won’t get into that too much here. The two big things I would change are: I would attach the weather and rain cover somewhere on the bag permanently! Secondly I wish I could get some type of cover for the straps! They are amazing don’t get me wrong I have never had a bag that felt as nice as this one does on but let me tell you that material will rip your hair out. It just seems to catch it. You can check out more about the bag here –>> http://www.kata-bags.com/bumblebee-222-ul-for-1-2-pro-dslr-w-70-200-lens-4-lenses

Anyway the first thing I pack is…. Bug repellant! Sounds funny I know but nothing is worse than sitting in the grass to get a shot and getting eaten alive while doing so! In Japan they make these nice little devices you can wear or attach to whatever you like that look much like an oversized wristwatch that keep everything away. It’s light, lasts for hours, no smell and no chemicals on your skin! So I dont have to worry about touching my equipment or reapplying it. I just attach mine to my bag and go for the most part. If I know I am going to be moving into a highly infested area such as tall grass I will move it to my ankle or wrist and then I am good to go. The device looks like this

bug

There are a few other things I always have in my bag that have been lifesavers or well camera savers! The first is rain gear for my baby. There are many different types and I guess it depends on what you will be exposing your camera too. I didnt want it to take up much room or cost me an arm and a leg. So I went with a soft type I can fold and stick in a pocket. This means that though I shouldn’t pull out my camera in the driving rain I can get by. I usually carry an umbrella also so this isn’t a huge deal but it gives me piece of mind. On the body without a lens it looks like this.

Of course I will need my camera. Here is a shot of the Canon 7D and strap. I love this camera! I started out with Canon Rebel XTi when it first came out. I stuck with it until my sister needed a camera and I wanted an upgrade. So I passed it down and went almost a year without a camera! Needless to say this is my second baby, my dog being my first 😉


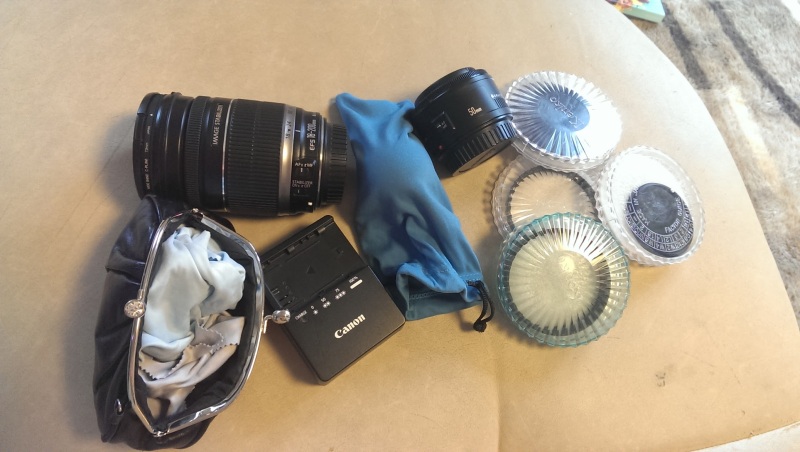
Now all the camera stuff that I bring on a day trip or a 3 day trip. Here is my everyday head out with the camera stuff.  I always have an extra battery which I forgot to throw in this photo but I do carry one extra fully charged battery. Of course my battery charger for the just in case I blow through two. My two travel lenses which are a 18-200mm and a prime 50mm. I have found these two work best for my needs and that way I don’t have to carry extra weight. I of course carry an array of filters. On the 18-200mm I usually have my Kenko C-PL W filter on and ready but I also carry a macro, a ND 8(w), and 8x-cross for the 72mm and just a ND 4 for the 58mm. I carry my lens cleaners in a small clutch thing because well, I have a dog who sheds, and sheds small light brownish-red hair that gets EVERYWHERE and so as an extra step of protection I keep them in their own little pouch. Same with the blue bag. It holds an air blower and a Hakuba Sensor Klear 2 which I use on everything BUT my sensor!! It great for cleaning the eyepiece or getting a difficult smudge off glass. It works great for that!  IF I am going to do a sensor cleaning I buy a brand new one and use it once and then it goes into the blue bag. I am terrified of ruining  my sensor so to say the least I am paranoid about cleaning it. The blue bag also carries two extra cards in their own cases in case I fill my main one. You will notice I don’t have a speed light! I am hopefully getting one this month and then that will also be added to this pile along with a soft cover~


Following all the camera stuff there is of course my personal basics that I usually don’t leave home without for the most part whether it’s in the camera bag or in the purse. Some of these are specific to living in Japan while others are not. So we will start top left and just go around and around until we reach the center! Sound good? Good! Get ready! Here we go! First is a face powder, not that I’m vain but this powder also helps keep the grease off the LCD of the camera not to mention a matte face 😉 Then I always carry a pen! Black ink and this one is 1.0. I love the look it gives my crazy handwriting and if i need to jot something down it is readily available. Of course I have my phone charger. Its micro USB so it also works for two more things in this mess, bonus points for you if you can guess them! I have a mini-man fan! This fan is particularly aimed at men here in Japan its small and black but it fits my needs perfectly and boy do you need it some days in japan! I also carry a watch and sunglasses. Not just to be on time and look cool but so I also can plan out when to be where.  I then have a mirror, again for the vain part of me but also to help reflect light and in some cases act as a backdrop to something small. Going along with the small things I always carry a mini tripod so I don’t need to worry about setting my directly on the ground. Sand in the battery compartment is a serious issue! I try to carry a travel toothbrush and toothpaste because well… it just seems nice to do. It’s hard to see but yes that brown thing underneath the toothbrush is actually my house key. Can’t leave home without it! I also carry my train IC cards. Not only to get from place to place but these lovely things also work in convenience stores here in Japan making a run for a bottle a lot easier than fumbling for change. I of course carry my Kindle for relaxing on the train at night when I can’t really get a nice shot or just if I need a little down time. The white thing which is a little blown-out (sorry) is an extra battery for anything that you can use an USB cable with. Bonus points awarded to you if you guessed these to items! They can be charged using a micro-usb charger! I tend to also carry a wet wipe. These help for sticky fingers after lunch. The bright red case is mints, again why not? The small pink cloth is a necessity here in Japan as many bathrooms don’t have hand dryers or towels so its pretty much bring your own! I usually also have tissues, because along with no dryers or towels many bathrooms also do not have toilet paper… a definitely scary prospect if you are ever caught without! Next is my camera remote just in case I need a night shot or a selfie. The white thing its on is actually a stack of blank business cards which are great for carrying and jotting things down.  I haven’t gotten around to designing my own business cards yet but it’s on my to-do list for this year! A hair band! My hair is the longest its been since I was a child so I need this, always!  A business card holder is the small black and silver things just in case I get handed one. Chapstick! Again not vain but a necessity when traveling in trains and buses as it is usually dry, dry, dry, air. A small LED flashlight for pin pointing night shots or light painting or even illuminating the path ahead! FLOSS!! Beyond its capability of also acting as string 😉 It is also another thing that well why not? Finally my i-pod just in case the Kindle isn’t enough to relax me. Very hard to see but under the i-pod is a small container which contains ibuprofen for those days when lighting seems to strike and thunder seems to pound in my head.  That is all that I carry in more of a personal arena. It may seem like a lot but for me everything is kind of an necessity. The only other thing I can think of, but I had used all of it and thrown the container away, is sunscreen it is a MUST in my book!


That is all I regularly carry in my bag for small trips not including clothes and make-up and other things that surprisingly fit in this bag very well! I usually dont bring my tripod as it makes the bag a little unwieldy. This again though depends on the trip and if I think it is a necessity to get the shots I want! Going on day trips is something I greatly enjoy here in Japan. Its the perfect country for it if you don’t mind the train! If you are over here or make it over here and want to go on a photo trip just drop me a line! I’m always up for travel even if it’s some place I have been before! Hope you travel safe and prepared for whatever the world throws at you and your camera!


Remember it isn’t the camera that makes the photographer, it’s the eye behind it.

~Anne

Being Mobile

Almost everyone has a camera on them. If you are reading this you probably own and have with you at this moment at least one or two cameras. One would probably be on your computer or tablet or whatever you are reading this on and the other would be on your cell phone/mobile. I am sure many of you have heard of the Chicago Sun-Times firing the whole photography staff and then giving out iphones to make up the “new” staff. It was a shock to the photo community as a whole and in a way a sign of the things to come. What is interesting is when you come down to it being a “photographer” is the easiest job to get in the world because all you technically need is a camera, preferably you also have talent but its art, so again subjective. Instagram fame aside apps like Flickr’s, Streamzoo, 500px, Lightbox, Muzy, and We heart it, all point to a new direction in photography. Social sites like G+ and Facebook have a heavy emphasis on photos and even offer automatic uploading from your mobile device. The new trend is towards social photography. We enjoy “hearting” or “thumbing” to show our appreciation but let us not lie….. we also greatly enjoy being a critic, and an anonymous critic at that, no chance for backlash well not a great chance, you can always block them. Using these services in a way also limits the photographer. They no longer have to think about how to show this photo to the best of their ability. This also affects how we see things and what we expect in a photo. When everything is laid out cleanly we become more attracted to it because it’s easier to process and able to be processed quicker. Instagram for example only works in one frame, that of a square, all members of the community must operate within that square. So when we pull up IG it automatically appeals to us because everything is uniform. Though the pictures are different the layout is always the same. When you move over to Streamzoo for example the “photographer” has the option of using their original photo or cropping it. It doesnt seem as visually appealing for this simple reason. But social photo-sharing sites and services aside. How else is this changing photography and what are some key points to remember when you are out and about and only have your mobile available?

What are some simple tips to great, well decent, mobile photos you ask? Well most our common sense and a few are some that are always optional.

1. CLEAN YOUR CAMERA! Let me just say that my phone resides for most of the day at the bottom of my purse, and well… I think I still have a few M&M escapees down there too…>.>  Among other things. But needless to say I have found this clears up quite a lot of my “cloudy” photos. Whether you decide to go all out with a case or to just carry around a small cloth for cleaning it will definitely will help you out!

2. Check your case. If you have a case do a little test. Take a photo with the case on and the same photo with the case off. You might be surprised but the photos may actually be quite different. Due to lighting, shadows, focusing in & out, and how secure you case is there could be a difference even if slight in the quality of your photos. I have to take off my case if I plan on doing a short video or a shadowed scene or sometimes depending on the light a bright as my case is red and reflects a bit the light in my photos also changes.

3. Check your settings. No I’m not talking about your “night mode” or “portrait mode” I am referring to all the other options your phone may have. In my case I have a global HTC One ❤ which I love! Not sure how fond of the “ultra pixel” I am yet… more on that later. However, as for optional settings I can control my Crop, Quality, In phone Image adjustments, ISO, White Balance, Lock focus, Auto smile capture, Geo tagging, face detection, auto uploads, Touch to capture, Grid, Continuous shooting, default filter, and Flash just to name a few. These settings can be personalized to your style to help you get the photos you want.

4. Get the Light! Lets face it, you aren’t carrying around a mini-DSLR here. All phones are different but lets just say that the sensors are all about the same size… for the most part. Don’t expect amazing HDR photos or superb night shots because it’s just not going to happen. Read the light, change the light, use the flash! Whatever you need to help brighten your subject the better it will look.

5. Now go on and check your mode. Most smartphones today come with different modes, or filters. These can both help or hinder you…. but they are there! USE THEM IF YOU NEED THEM!

These are probably the most common sense things once you read them but I doubt you have seen many people clean off the lens after they pull it out of their pocket before they take the shot. Now I can’t tell you how to take your shot only that these will help you get that shot!

Last but not least depending on your phone and your style you might want to get or invest in a phone photo editor. I enjoy Snapseed. It works great for me.

I will leave you with a few shots that were shot by my HTC One and minor edits in Snapseed.

Up or Down~ Illusion

Squishy Nose~ It’s her ball

Remember it isn’t the camera that makes the photographer, it’s the eye behind it.

~Anne

Studio Lighting

Alright, ladies and gents, today’s post is all about studio lighting!  I can’t speak to Anne’s experiences, but I took a couple of digital photography classes in college where we learned the basics of studio lighting.  And now I’m here to pass the savings on to you!  I mean the knowledge.  I’m going to pass the knowledge on to you.

Sort of in hand with the previous post about high key and low key lighting, there’s a few names to the quality of light being used.  Soft light is exactly how it sounds it would be.  There are little to no harsh shadows or highlights and the contrast is not too sharp, either.  Hard light is the opposite.  It’s high contrast with harsh shadowing and harsh highlights.  See the examples below.

Model: Darrien.  Shot with a Nikon D5100.  No editing.  Soft light.

    Model: Darien. Shot with a Nikon D5100. No editing. Soft light.

Model: Nick.  Shot with Nikon D5100.  No editing.

Model: Nick. Shot with a Nikon D5100. No editing. Hard light.

There’s also special terminology for where a light is coming from.  Hint: the terms are super easy to remember.  Front light comes from in front of the subject.  Back light comes from behind the subject.  Side light comes from – wait for it, this one’s a tricky one – the side of the subject.  Tough, right?  Below are some examples.

Models: Kevin and Daniel.  Shot with a Nikon D5100.  No editing.  Front Lighting.

Models: Kevin and Daniel. Shot with a Nikon D5100. No editing. Front Lighting.

Shot with a Nikon D5100.  No editing.  Back Lighting.

Shot with a Nikon D5100. No editing. Back Lighting.


Model: Me! Photographer: Ryan Edner.  Unsure camera make/model. Unsure about editing.

Model: Me! Photographer: Ryan Edner. Unsure camera make/model. Unsure about editing.

As you can see with some of the above shots, it’s fun to play around with colored lighting.  While I style myself as a natural light photographer, sometimes it’s nice to be able to control my light source.  Adding interesting colors without the use of photoshop is also very nice.  I would highly suggest renting studio lighting or coming up with a rig of your own if you’re attempting more complex and abstract photography ideas.  Product photos are also better done in some sort of studio setting.  Or, at the very least, with controlled lighting.

The one downside I can see to studio lighting is that if you’re working with a inexperienced models, being in such an intense setting might make them uneasy and hard to get any good pictures until the model relaxes.  It really helps if you can joke around and make your models feel comfortable in their settings.  But that’s a trick for an entirely different post.

Now get out there and shoot!

-Kate

It’s the little things

Perfect perfect! I cant wait to get home and get it off the camera. *later* WHAT??!! It didn’t look like that on the camera display!

Ever had one of those shots? They are probably the most common type of shots. Its why most of us have 500+ photos from a trip we went on and only publish 20. I have them all the time! I hate them! They are the bane of my existence, well at least the bane of my computer storage. So here are a few tips that help bring that 20/500 ratio to a more solid 250/500. You friends and family will then be overwhelmed with all the photos you took!

The first problem is how the display on your camera shows the photos. This varies from camera to camera, brand to brand, and greatly affects how  you see your photos! Now the first question is did you change anything in the Picture Styles(C)/Picture controls(N) in your camera? Did you know you could? That would be the first thing to check. The second is do you shoot in RAW or in JPEG. To K.I.S.S. on the difference between RAW and JPEG lets just say that the RAW file is bigger/better for the simple reason that it contains more data. I can’t get into all the deep details in this post because it would be epically long but it would be in your best interest to dig  more into you camera settings themselves. As Kate has a Nikon and I have a Canon maybe we will do a collab post in the future on our settings.

The second problem, lets be honest, is being in focus. There is no amount of sharpening that can fix an unfocused photo. There is no option to go back and hit that exact same spot at the exact same time under the exact same conditions. So take your time, no rush, and FOCUS. Also if you are doing manual focus make sure you dont bump, or do if you need to, the little +/- dial thingy (no idea what its called diopter adjustment dial). It might also help, especially if you are going to be printing or submitting to a contest to buy a LCD loupe. Now if you know photography you know that a loupe is typically used to look at negatives up close, you also might recognize it as what your cartoon favorites always pull out to inspect diamonds. Now if you are going to have a diamond sharp photo you need one of these to check your focus before you are all packed up and enjoying a nice drink in front of your computer. They can run between 15$ and 100$ depending on what you want.

The third most common problem is from your computer to paper, PRINTING! It can suck. The first thing you should invest in after your camera and computer is a monitor calibration tool. Now many people will tell you they can trust their eyes or know what their prints will look like and to you I say….

How many white or was it black dots do you see?

As you can see, between our eyes and our brains there can be some variance in communication. When you spend three or four hours in front of your computer this can become exacerbated. Colors may even begin to switch on you, even if you just sat down. Even blue light cutting glasses won’t save you here!

If you stare at the blinking pink dots, you will see only one color, pink. If you look at the the + in the center, you’ll see a circle of pink dots and a rotating green dot. Now, stare at the + without moving your eyes. After ten seconds scroll down a bit and watch a bright green circle appear to move with you *Click on the image to be taken to the site its from*

The last and but not least remember you can adjust your white balance and exposure when you do it get home. Many find it helpful to shoot +1 or more exposure wise because you can always go in and darken what you need to, while on the other hand its a lot harder to bring things out of the shadows.

Here is a before and after of the same version and while it may not be a big difference, it is big enough to post or to trash in my opinion.

Original Shot

Before

As you can see dull, gray and boring. I like the darkness of it myself and the shadows in the background but this photo doesn’t say Japanese Sakura like it should.

After

As you can see in the second photo a bit brighter, colors with a little more pop and not so heavy on the shadows. All changes were done in Camera Raw itself and didn’t step into full photoshop.

Its the little changes and steps that make a difference in your photos. Its the time you take and the effort you make.

-Don’t be afraid to push the button, go on, PUSH IT!

~Anne