Camera History: Early Fixed Images

It’s another installment of Camera History!  Last time, we covered the precursor of the modern camera, camera obscura.  Today we’ll delve into the very beginnings of photography with the earliest cameras and experiments in capturing an image without having to trace it.

The first partially successful photograph was taken in 1816 by one Nicéphore Niépce.  When I say “partially successful,” I mean that the photograph was not permanent and eventually darkened completely.  Niépce used a small camera of his own design and a piece of paper coated with silver chloride, which darkened where it was exposed to light.  He didn’t know how to remove the unused silver chloride, which is why it was not permanent.

Before the photographic process was perfected, there was no way to truly preserve the images.  After some experimentation, in 1826 Niépce used a sliding wooden box camera (made by Charles & Vincent Chavalier in Paris, France) and bitumen to create a permanent photograph that still exists today.  It’s not a perfectly preserved image, but it was a huge step forward.

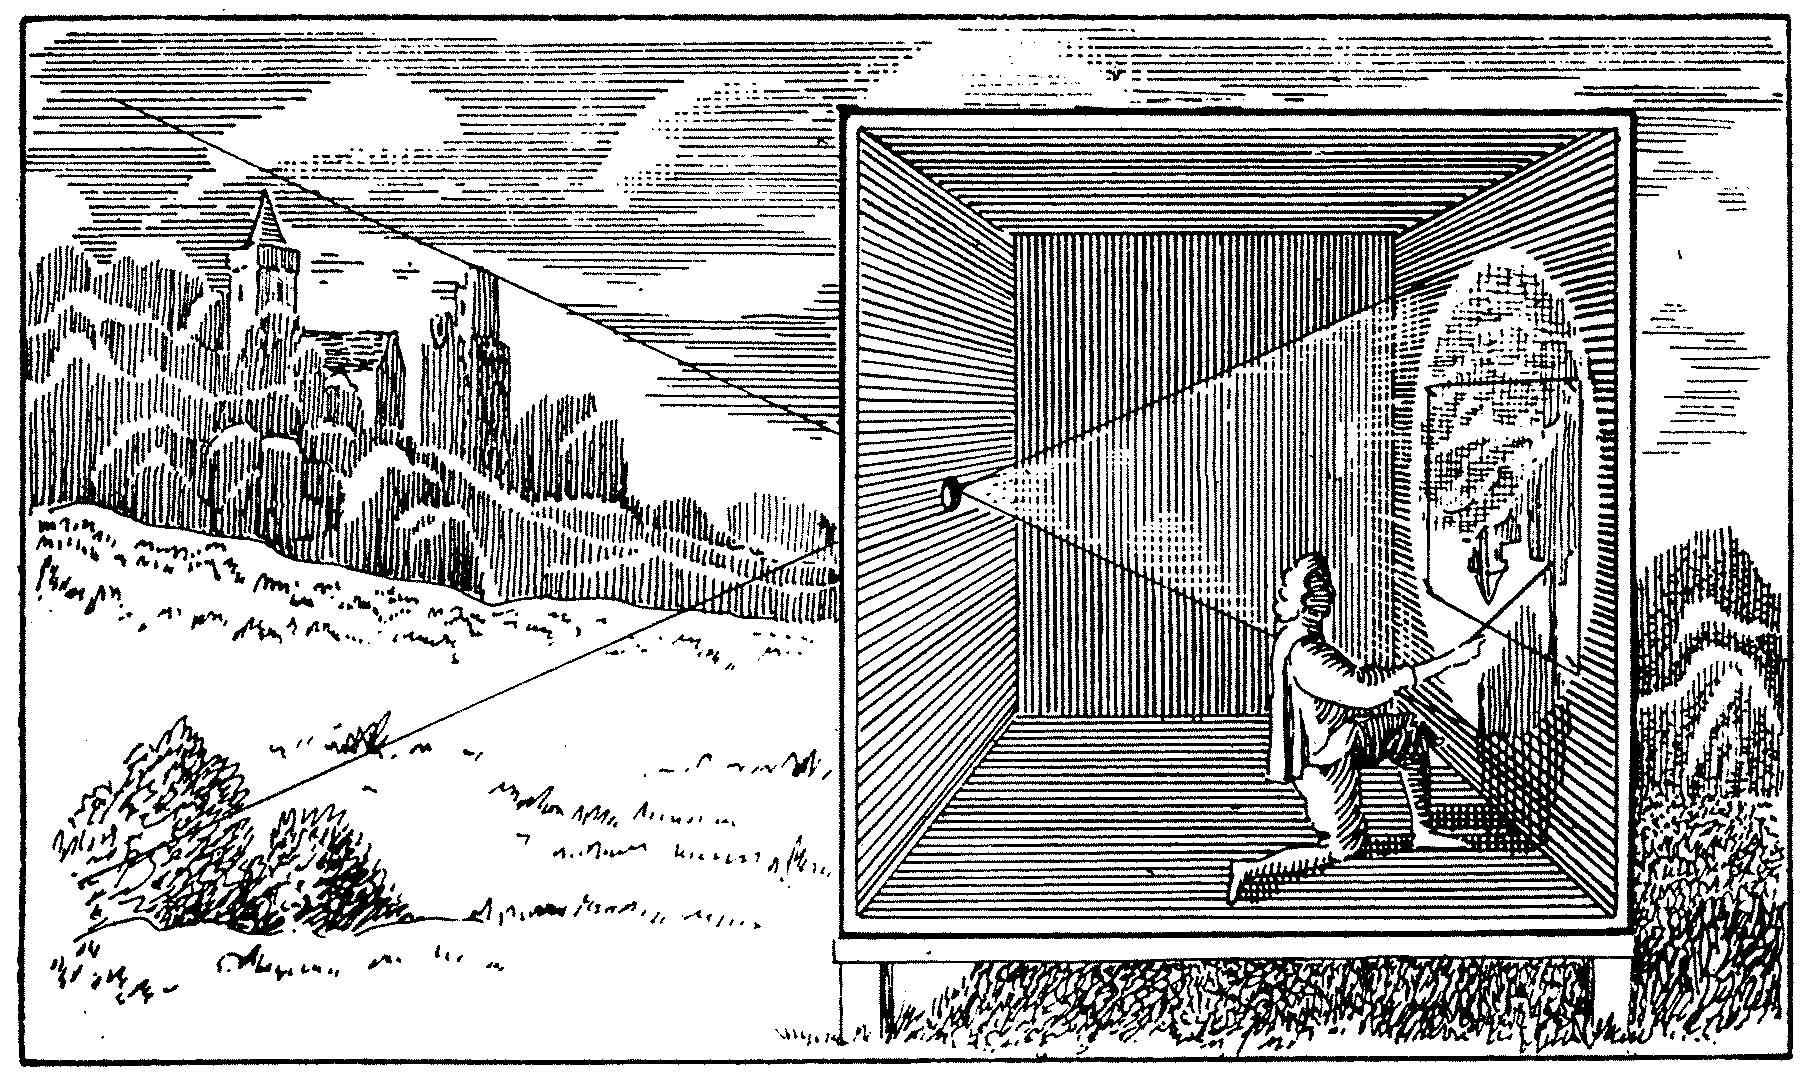
I want to get in to the chemical details of both silver chloride and bitumen, but first I just want to give a sort of shout out to Johann Zahn.  Zahn envisioned the first camera that was small and portable enough to be used for practical photography in 1685.  It wasn’t until about 150 years later that his vision would be possible, but gotta give credit where credit is due!

Alright, time for some science mixed in with this history!

First up is Silver Chloride (AgCl).  It’s known for it’s low solubility in water.  How it works in photography is that when silver chloride is exposed to light or heat, it changes into silver and chloride.  The silver appears as a grey or purple coloration where as the chloride dissipates into the air.  It is also used as/in:

  • an infra-red transmissive optical component that can be hot-pressed into window and lens shapes
  • an antidote for mercury poisoning
  • a way to create yellow, amber, and brown shades in stained glass manufacturing
  • bandages and wound healing products

Then we have bitumen, aka asphalt (that surprised me, too!).  It’s used in the oldest surviving photograph.  It can still be used for photography today, but it’s a long process to get any outcome.  First, you have to thinly coat a pewter plate with bitumen.  It takes many, many hours of exposure to light to create a picture.  Exposure to light hardens the bitumen and makes it insoluble.  When the final picture is rinsed with a solvent, only the sufficiently light-struck areas remain.  However, ultimately, using bitumen in photography is extremely impractical.

And that wraps up our lesson for today!

I’d like to take a moment to apologize for getting off schedule.  I was at a wedding over the weekend, and Anne was on a photojournalist gig.  She’ll be posting on Sunday and then starting on that Sunday, posting is going to get more intensive!  We’re going to attempt to post every day of the week!  So stick with us through September to see all the cool things we come up with!

Get out there and shoot!

-Kate

On Being Professional

Sunday, August 25th, I did photography for a wedding.  While not the first wedding I’ve worked, it was definitely the biggest.  I’ve learned a lot from the experience and am going to pass that learning on to you, dear readers.

First thing is to make sure you have your own ideas to bring to the table.  Just because your clients want certain things doesn’t mean they won’t also want something you suggest.  On top of that, who hires someone who doesn’t add to the job with their expertise?  Going hand and hand with having your own ideas is accepting that your client is the one that’s really in charge.  You may have the expertise and equipment, but it’s ultimately them that need to be happy with the photos.  

For example, since my forte is natural light, I had a spot picked out where I wanted to take Mike and Missy’s first look photos.  It was out next to the lake, by the hotel’s outdoor area to their restaurant.  As pretty as I thought the location was, and as sure as I was that I could get an amazing shot, Missy just was not comfortable being in a position where so many strangers would see her in her wedding dress (which was stunningly beautiful, by the way) and have to deal with all of the attention.  Even if she had agreed to the location, I wouldn’t have gotten that shot out of it because Missy would have been uncomfortable.  It’s a give and take between photographer and client.

Don’t be afraid to make requests, either.  I was lucky enough to be able to attend the rehearsal before the wedding and quickly found out that with the way the chairs were set up, I wouldn’t be able to move down the right-hand aisle without getting in the way.  The wedding coordinator, also named Missy, was able to adjust the chair placements with hotel staff before the actual ceremony and I was able to move around with ease.

Speaking of being lucky enough to attend the rehearsal, don’t pass up any opportunity you might have to prepare for a job.  I was able to assess the lighting situation beforehand, and knew what to expect from the setup.  I knew where I needed to be and when I needed to be there to capture the best moments.  I was far less prepared at previous weddings and I feel that the extra preparation really paid off.

Another example: I was on location in Walker, MN, and completely unfamiliar with the area.  The bride and groom wanted to have their family and bridal party photos outside.  I was able to go with them and their wedding coordinator before the wedding day and we picked out locations close to the hotel, decided what photos would be where, and went over a list of must-have photos.  The day of the wedding, it was a scorching 119° F outside.  Even in the shade, it felt like we were melting.  Because of the preparations done earlier, I was able to save family and bridal party alike from waiting out in the heat for their turn to be in pictures.  We had allotted two hours for bridal party and family pictures, and we ended up only taking an hour and a half, maybe a bit less.  Those not needed to be in photos immediately were able to stay cool and wait inside, and because of the list of who was needed in what pictures, no one really needed to stay outside longer than 15 minutes.  With the exception of yours truly.  But, being the professional that I am, I powered through it and got beautiful results.

Lastly, I want to touch on doing paid jobs for friends.  If you’re just starting out in the photography-for-money world, more likely than not you’ll end up working gigs for your friends first before getting more business from outside your personal connections.  The wedding I worked over the weekend was actually the wedding of one of my best friends.  He was constantly encouraging me to take it easy and not work so hard, asking if I needed a break or if I was okay.  While part of my work ethic on his wedding was absolutely because Mike is a very dear friend to me and I wanted him to both have fabulous photos and get the biggest bang for his buck, an equal part was simply because I was being paid to do a job and I would be damned if I didn’t do it to the absolute best of my ability.  I learned the hard way on a previous wedding job with another friend how easy it is to take advantage of a friendship, as either the photographer or the client.  I was able to enjoy the reception once my duties as wedding photographer were done, and I will admit to breaking my professionalism once during the ceremony (c’mon, who doesn’t cry when one of their best friends gets married to the woman of his dreams?).

In these situations it’s a fine balance between friendship and professionalism.  And while my favorite couple is honeymooning in St Lucia, I will soon be sorting through all the photos and editing where needed.  A photographer’s work is never done!

Be professional when you get out there and shoot!

-Kate

P.S. All the best wishes and happiness in the world to Mike and Missy!

Being Mobile

Almost everyone has a camera on them. If you are reading this you probably own and have with you at this moment at least one or two cameras. One would probably be on your computer or tablet or whatever you are reading this on and the other would be on your cell phone/mobile. I am sure many of you have heard of the Chicago Sun-Times firing the whole photography staff and then giving out iphones to make up the “new” staff. It was a shock to the photo community as a whole and in a way a sign of the things to come. What is interesting is when you come down to it being a “photographer” is the easiest job to get in the world because all you technically need is a camera, preferably you also have talent but its art, so again subjective. Instagram fame aside apps like Flickr’s, Streamzoo, 500px, Lightbox, Muzy, and We heart it, all point to a new direction in photography. Social sites like G+ and Facebook have a heavy emphasis on photos and even offer automatic uploading from your mobile device. The new trend is towards social photography. We enjoy “hearting” or “thumbing” to show our appreciation but let us not lie….. we also greatly enjoy being a critic, and an anonymous critic at that, no chance for backlash well not a great chance, you can always block them. Using these services in a way also limits the photographer. They no longer have to think about how to show this photo to the best of their ability. This also affects how we see things and what we expect in a photo. When everything is laid out cleanly we become more attracted to it because it’s easier to process and able to be processed quicker. Instagram for example only works in one frame, that of a square, all members of the community must operate within that square. So when we pull up IG it automatically appeals to us because everything is uniform. Though the pictures are different the layout is always the same. When you move over to Streamzoo for example the “photographer” has the option of using their original photo or cropping it. It doesnt seem as visually appealing for this simple reason. But social photo-sharing sites and services aside. How else is this changing photography and what are some key points to remember when you are out and about and only have your mobile available?

What are some simple tips to great, well decent, mobile photos you ask? Well most our common sense and a few are some that are always optional.

1. CLEAN YOUR CAMERA! Let me just say that my phone resides for most of the day at the bottom of my purse, and well… I think I still have a few M&M escapees down there too…>.>  Among other things. But needless to say I have found this clears up quite a lot of my “cloudy” photos. Whether you decide to go all out with a case or to just carry around a small cloth for cleaning it will definitely will help you out!

2. Check your case. If you have a case do a little test. Take a photo with the case on and the same photo with the case off. You might be surprised but the photos may actually be quite different. Due to lighting, shadows, focusing in & out, and how secure you case is there could be a difference even if slight in the quality of your photos. I have to take off my case if I plan on doing a short video or a shadowed scene or sometimes depending on the light a bright as my case is red and reflects a bit the light in my photos also changes.

3. Check your settings. No I’m not talking about your “night mode” or “portrait mode” I am referring to all the other options your phone may have. In my case I have a global HTC One ❤ which I love! Not sure how fond of the “ultra pixel” I am yet… more on that later. However, as for optional settings I can control my Crop, Quality, In phone Image adjustments, ISO, White Balance, Lock focus, Auto smile capture, Geo tagging, face detection, auto uploads, Touch to capture, Grid, Continuous shooting, default filter, and Flash just to name a few. These settings can be personalized to your style to help you get the photos you want.

4. Get the Light! Lets face it, you aren’t carrying around a mini-DSLR here. All phones are different but lets just say that the sensors are all about the same size… for the most part. Don’t expect amazing HDR photos or superb night shots because it’s just not going to happen. Read the light, change the light, use the flash! Whatever you need to help brighten your subject the better it will look.

5. Now go on and check your mode. Most smartphones today come with different modes, or filters. These can both help or hinder you…. but they are there! USE THEM IF YOU NEED THEM!

These are probably the most common sense things once you read them but I doubt you have seen many people clean off the lens after they pull it out of their pocket before they take the shot. Now I can’t tell you how to take your shot only that these will help you get that shot!

Last but not least depending on your phone and your style you might want to get or invest in a phone photo editor. I enjoy Snapseed. It works great for me.

I will leave you with a few shots that were shot by my HTC One and minor edits in Snapseed.

Up or Down~ Illusion

Squishy Nose~ It’s her ball

Remember it isn’t the camera that makes the photographer, it’s the eye behind it.

~Anne

Collab Post: Hack My Photo! #1

Alright, dear readers, Kate here.  Today’s a special day for all of you!  Today, Anne and I have teamed up for a post!  It’s a new thing we’ll be repeating a lot as we get this whole “post a blog post” thing under our belts.  Today’s collaboration is called Hack My Photo! and here are the rules:

  1. You choose a photo for your partner in crime to edit.
  2. This photo cannot be more than a year old.
  3. You have a set time limit to edit the photo you are given.  Our time limit is 30 minutes.

And that’s it.  Pretty easy.  Except when you’re editing a photo you didn’t take.

Here’s the original photo Anne sent to me unedited, followed by the original unedited photo I sent to her.

Anne's original photo.

Anne’s original photo.

Kate's original photo

Kate’s original photo.

We’ll start with my edits because I’m the one typing this up.  When editing photos, I don’t usually even think to crop them.  This is because my shooting style is to zoom in/out to get the shot I want or move around until it’s framed the way I want it without me having to crop it in post.  So then, my first thought with the photo I was given was to bring out some sunlight and brighten the sky up a bit since it looks like it was a dreary day the day this photo was taken.  I did all of that in Camera Raw by adjusting the exposure and brightness and such.  I fiddled with specific colors’ saturation levels to try to get the sky even the tiniest bit more blue, but couldn’t make it work.  So I took the photo into Photoshop.  My go-to edit is Linear Contrast, so I slapped that on before doing anything else.  I love the way it looks.  From there, I did some more hue altering and brought out the blue in the sky by using the magic wand to select the sky area, making a new layer, adjusting the hue and saturation, and then changing that layer’s opacity to make it look more natural and less obviously edited.  I also did something similar to get the dark colors darker – I copied the original layer in Photoshop and layered it on with Darken and adjusted the opacity until I had it where I like it.  I tend to like darker photos with heavier contrast, and that’s what I ended up doing with this one.

Edited only in Camera Raw.

Edited only in Camera Raw by Kate.

Continued edits in Photoshop.

Continued edits in Photoshop by Kate.


Anne's edit of her own photo.

Anne’s edit of her own photo.

And now, here’s Anne’s bit, as written by her:

When I first saw this photo I loved the colors, the purple, yellow, white and bright spring green. So I opened it and got into editing it. However, because I am OCD or ADHD or whatever other acronym you want to throw in there my eye kept being drawn to the brown curly leaf(?) behind the iris. So I thought okay I will take this into PS and be done with it… I forgot about the fuzzy yellow stuff! So to cut a long story short it was just too much work in the 30 min time limit we gave ourselves. I liked the daisies on the right side and so I just went with them. For the first edit after doing a screen layer and a multiply layer and flattening them both in-between I went into the lens distort filter and added a small vignette and then a small bowing of the lens to give it a miniscule fisheye effect but in reality to bring the front flower and stem closer. The second part I didn’t crop as close as I wanted more of the vignette and more of the colors. I love the hint of pink in it. For the last one I cropped it closer but I’m not sure if I am happy with the results as you can see grain/noise in the photo. If I had more time I would probably go back in there with my pen and get all the fuzzy yellow stuff and use the picture as a whole but my (acronym here) wouldn’t let me.


Anne's first  edit.

Anne’s first edit.

Anne's second edit.

Anne’s second edit.

Anne's third edit.

Anne’s third edit.

Kate's edit.

Kate’s edit of her own photo.


Kate here again to send you off, dear readers.  What do you think?  Do you think our editing styles are similar?  Would you have edited either photo differently?  Let us know in the comments!  We’d love to hear from you, our lovely readers!

Get out there and shoot!

Kate & Anne

Studio Lighting

Alright, ladies and gents, today’s post is all about studio lighting!  I can’t speak to Anne’s experiences, but I took a couple of digital photography classes in college where we learned the basics of studio lighting.  And now I’m here to pass the savings on to you!  I mean the knowledge.  I’m going to pass the knowledge on to you.

Sort of in hand with the previous post about high key and low key lighting, there’s a few names to the quality of light being used.  Soft light is exactly how it sounds it would be.  There are little to no harsh shadows or highlights and the contrast is not too sharp, either.  Hard light is the opposite.  It’s high contrast with harsh shadowing and harsh highlights.  See the examples below.

Model: Darrien.  Shot with a Nikon D5100.  No editing.  Soft light.

    Model: Darien. Shot with a Nikon D5100. No editing. Soft light.

Model: Nick.  Shot with Nikon D5100.  No editing.

Model: Nick. Shot with a Nikon D5100. No editing. Hard light.

There’s also special terminology for where a light is coming from.  Hint: the terms are super easy to remember.  Front light comes from in front of the subject.  Back light comes from behind the subject.  Side light comes from – wait for it, this one’s a tricky one – the side of the subject.  Tough, right?  Below are some examples.

Models: Kevin and Daniel.  Shot with a Nikon D5100.  No editing.  Front Lighting.

Models: Kevin and Daniel. Shot with a Nikon D5100. No editing. Front Lighting.

Shot with a Nikon D5100.  No editing.  Back Lighting.

Shot with a Nikon D5100. No editing. Back Lighting.


Model: Me! Photographer: Ryan Edner.  Unsure camera make/model. Unsure about editing.

Model: Me! Photographer: Ryan Edner. Unsure camera make/model. Unsure about editing.

As you can see with some of the above shots, it’s fun to play around with colored lighting.  While I style myself as a natural light photographer, sometimes it’s nice to be able to control my light source.  Adding interesting colors without the use of photoshop is also very nice.  I would highly suggest renting studio lighting or coming up with a rig of your own if you’re attempting more complex and abstract photography ideas.  Product photos are also better done in some sort of studio setting.  Or, at the very least, with controlled lighting.

The one downside I can see to studio lighting is that if you’re working with a inexperienced models, being in such an intense setting might make them uneasy and hard to get any good pictures until the model relaxes.  It really helps if you can joke around and make your models feel comfortable in their settings.  But that’s a trick for an entirely different post.

Now get out there and shoot!

-Kate

The Highs and Lows

Its all about the light but in particular its how you see and use the light. Probably the hardest and most complicated part of photography beyond photoshop would be light. Composition is something you can study and it has rules. Lighting…. well its subjective.

Now most people know the “golden” hours and most also know the “blue” hours, however there are other hours based on where you live and whats around you. Here in Nagoya I have what I like to call the “blushing” hours, at dawn everything is rather pink-ish here. Spend a day watching the light, and picking out the hours you have,  whether its from your favorite cafe or from your bed through the window, this I lay down as a challenge to you.

Light as a whole though and how you see it and how it works in your photos is completely up to you. Subjective kinda sucks doesnt it? But I wanted to talk about two “styles” of using light in your photography as I cant really explain light to you. They are called “High Key Photography” and “Low Key Photography”. Even if you dont recognize their names you will recognize their looks.  The easiest way to explain it is high key is bright and Low Key is dark. Simple right? Or if you are a histogram person, high key leans right and low key leans left.

High key photography can range from a black and white picture, to soft pastels, to bright pops of color. They key is that there are no shadows or almost no harsh/deep shadows. High key photos usually give you that happy feeling or the soft romantic feeling. The amount of detail you keep in a high key photo is completely up to you. You have probably seen this style used the most in Instagram selfies, baby pictures, wedding pictures, pictures of flowers, and high end product ads(think any recent electronic). High key photos can be done many ways but the three most popular ways are to over-expose your shot, have your subject facing a bright lights, or photoshop. Photoshop can give you more control on what you want to keep and how you want the end result to look, especially if you are just starting out. Of course you can do all three. As for getting a high key shot this doesnt mean you blow-out all of your shots and voilà you have it mastered it! It takes a little bit. Go on and try it.

First Example of Bright color High key photo

More muted version of a high key photo

Low key as you can imagine is the opposite. It usually deals with spot lighting, low lighting, and of course dramatic lighting. These are also most commonly seen in black and white, muted colors or soft colors. It varies about but mostly you will have the subject against a completely black backdrop, harsh shadows and pinpointed lighting. You would usually see this type of photo for dramatic portraits, flowers, and “serious” introspective shots. As I dont have photos of people you can imagine that I fall into again…. dun da DUN! Flowers. Sorry, I know I need to expand my subject base. That’s part of the reason for this blog! If you want to see dramatic portraits open a magazine or simply google (yes i used that as a verb) Low Key Photography. Anyway on to the low key shots.

Low Light shot that retains color

Slightly blacker background but I liked the warm feeling so didnt black it out

These are two styles that we see almost everyday in various settings. Whether its online or in print. They are also probably two of the easiest styles to practice and hopefully perfect. I personally believe that high key photography is slightly easier than low key. Low key for me depends more on the lighting and how you read that lighting. Always a hard point for me. I hope that you learned something new today, and if not then teach me something new, that’s what the comments are for!

~It’s the time you take and the effort you make.

~Anne

Camera History: Camera Obscura

If you’ve come to this post looking for Camera Obscura the band, you’re now stuck reading the whole thing to get to the video at the bottom.  I’m using the honor system here, so no cheating!

Alright, my dear readers, it’s time for a history lesson.  Today I will be writing about the history of the camera.  Well, part of the history of the camera.  There’s a lot more to the invention of the camera than I thought, and a lot more steps from that to the DSLRs we use today that I think are important to cover more in depth.  Especially since the history of the camera goes back farther than the history of photography.

To get to the invention of the camera, we have to start with it’s predecessor, the camera obscura.  This device dates back to ancient Greece and ancient China and was a tool that helped mankind learn about light and vision.  The term “camera obscura” is Latin and means a darkened chamber (camera = vaulted chamber/room, obscura = dark).  German astronomer Johannes Kepler – you might know him from Kepler’s Laws of Planetary Motion, if you paid attention in science class – coined the term in 1604.  The basic purpose of a camera obscura is to project an image of it’s surroundings on a screen or wall and is used for entertainment and drawing/painting.

Image found by Google search; 1stpersontech.wordpress.com

Image found by Google search; 1stpersontech.wordpress.com

A basic description for this type of device was first mentioned by Chinese philosopher Mozi (470 BC – 391 BC).  He described what we now call a pinhole camera-type device, referring to it as a “collecting plate” and a “locked treasure room.”

Alhazen, an Arabic scientist and astronomer, gave the first clear description of a camera obscura as well as an analysis of the device and what it does.  He was the first to demonstrate that what was being projected is an image of everything on the other side of the hole, instead of just light, as previously used.  He did this by successfully projecting an entire image from outdoors onto a screen indoors.

In the 9th century, Chinese scientist Shen Kuo attributed the fact that the image is inverted to it being projected through a small hole.  Earlier beliefs held that the reason for the image being inverted was caused by other things.  For example, one earlier Chinese philosopher wrote that the inversion of the image was caused by the camera obscura being set up next to the sea and the image being of the sea.

Image found by Google search; en.wikipedia.org

Image found by Google search; en.wikipedia.org

While the camera obscura had mainly been used for entertainment as well as studying various aspects of light, in the 13th century Englishman Roger Bacon suggested that the device could be used to safely observe solar eclipses.  It’s use as a drawing aide wasn’t widely seen until the early 15th century.

Giambattista della Porta ‘perfected’ the camera obscura by adding a convex lens to the hole to make the projected image both brighter and more in focus.  He used this as an easy-to-understand example of how the human eye works.

Early models of the camera obscura were quite large, needing an entire darkened room or tent to function correctly.  But as advances in science were made, the camera obscura became more and more easily portable around the 18th century.

Portable, but larger camera obscura; Image found by Google search; www.vintag.es

Portable, but larger camera obscura; Image found by Google search; http://www.vintag.es

Portable camera obscura; Image found by Google search; physics.kenyon.edu

Portable camera obscura; Image found by Google search; physics.kenyon.edu

The camera obscura, while not an actual camera, is still used today.  It’s main purpose continues to be entertainment, education, and is still used as an artistic aide.  Basic ones are fairly easy to put together, as seen in the picture below, but more complex configurations exist as well.  You can see a neat visual of the timeline of the camera obscura here.

How to make your own camera obscura; Found by Google search; myriadmisgivingsofamonk.tumblr.com

How to make your own camera obscura; Found by Google search; myriadmisgivingsofamonk.tumblr.com

And now, lovely readers, I do believe I promised you some music.  If you actually read this post, honest and true, I commend you for not just scrolling down like I probably would have.  Enjoy “Let’s Get Out of This Country” by Camera Obscura.

It’s the little things

Perfect perfect! I cant wait to get home and get it off the camera. *later* WHAT??!! It didn’t look like that on the camera display!

Ever had one of those shots? They are probably the most common type of shots. Its why most of us have 500+ photos from a trip we went on and only publish 20. I have them all the time! I hate them! They are the bane of my existence, well at least the bane of my computer storage. So here are a few tips that help bring that 20/500 ratio to a more solid 250/500. You friends and family will then be overwhelmed with all the photos you took!

The first problem is how the display on your camera shows the photos. This varies from camera to camera, brand to brand, and greatly affects how  you see your photos! Now the first question is did you change anything in the Picture Styles(C)/Picture controls(N) in your camera? Did you know you could? That would be the first thing to check. The second is do you shoot in RAW or in JPEG. To K.I.S.S. on the difference between RAW and JPEG lets just say that the RAW file is bigger/better for the simple reason that it contains more data. I can’t get into all the deep details in this post because it would be epically long but it would be in your best interest to dig  more into you camera settings themselves. As Kate has a Nikon and I have a Canon maybe we will do a collab post in the future on our settings.

The second problem, lets be honest, is being in focus. There is no amount of sharpening that can fix an unfocused photo. There is no option to go back and hit that exact same spot at the exact same time under the exact same conditions. So take your time, no rush, and FOCUS. Also if you are doing manual focus make sure you dont bump, or do if you need to, the little +/- dial thingy (no idea what its called diopter adjustment dial). It might also help, especially if you are going to be printing or submitting to a contest to buy a LCD loupe. Now if you know photography you know that a loupe is typically used to look at negatives up close, you also might recognize it as what your cartoon favorites always pull out to inspect diamonds. Now if you are going to have a diamond sharp photo you need one of these to check your focus before you are all packed up and enjoying a nice drink in front of your computer. They can run between 15$ and 100$ depending on what you want.

The third most common problem is from your computer to paper, PRINTING! It can suck. The first thing you should invest in after your camera and computer is a monitor calibration tool. Now many people will tell you they can trust their eyes or know what their prints will look like and to you I say….

How many white or was it black dots do you see?

As you can see, between our eyes and our brains there can be some variance in communication. When you spend three or four hours in front of your computer this can become exacerbated. Colors may even begin to switch on you, even if you just sat down. Even blue light cutting glasses won’t save you here!

If you stare at the blinking pink dots, you will see only one color, pink. If you look at the the + in the center, you’ll see a circle of pink dots and a rotating green dot. Now, stare at the + without moving your eyes. After ten seconds scroll down a bit and watch a bright green circle appear to move with you *Click on the image to be taken to the site its from*

The last and but not least remember you can adjust your white balance and exposure when you do it get home. Many find it helpful to shoot +1 or more exposure wise because you can always go in and darken what you need to, while on the other hand its a lot harder to bring things out of the shadows.

Here is a before and after of the same version and while it may not be a big difference, it is big enough to post or to trash in my opinion.

Original Shot

Before

As you can see dull, gray and boring. I like the darkness of it myself and the shadows in the background but this photo doesn’t say Japanese Sakura like it should.

After

As you can see in the second photo a bit brighter, colors with a little more pop and not so heavy on the shadows. All changes were done in Camera Raw itself and didn’t step into full photoshop.

Its the little changes and steps that make a difference in your photos. Its the time you take and the effort you make.

-Don’t be afraid to push the button, go on, PUSH IT!

~Anne

Get a Different Perspective

Don’t you just hate when the photography bug bites and you’re somewhere that you’ve been a thousand times before and it just sucks because there’s nothing to really inspire you?  You just sit around the park by your house or the lake at your family’s summer cabin, camera in hand, staring wistfully at the screen or through the view finder.  All you can manage are a few family photos that you’re basically forced to take just because you have the “nicest camera!”

In these situations, you have to force yourself to think outside the box.  When you’re at Grandma’s house for the millionth time, you can’t expect to find the same tree that’s been in the front yard since your mom was born as interesting as it was the first twenty times you photographed it.

This advice comes from personal experience: don’t be afraid to get a little dirty.  Get on your knees.  Lie on your back.  Get a little closer than you usually would.  Move a little farther away.  Look at your surroundings from a different perspective.

Nikon D5100. Edited in Camera Raw.

Steven’s Point, WI.  Nikon D5100. Edited in Camera Raw.

Take a walk around and make a note of the things you have photographed a thousand times before.  Think about where you usually stand or what angle you usually take the photos at.  Then don’t do those things.  Do something different.  And again, don’t be afraid to get dirty!  I was up to my eyes in this tall grass in a ditch on the side of a dirt road.  Bug bites galore, but I love this shot of my grandparent’s barn.

Nikon D5100. Edited in Camera Raw.

Steven’s Point, WI.  Nikon D5100. Edited in Camera Raw.

Us grandkids have always been told to stay away from the barn, which is falling apart at the seams.  But be willing to break the rules, so to speak.  Get up close and personal with something you’ve stayed away from.   Look critically around you and step outside your photography comfort zone to find a picture you wouldn’t have typically taken but will absolutely love.

Nikon D5100. Edited in Camera Raw.

Steven’s Point, WI.  Nikon D5100. Edited in Camera Raw.

Even things that you would normally take photos of (for me, that’s flowers) can become a source of inspired photographs – especially when the subject seems old hat.  It’s all a matter of twisting your body and holding your breath to get the shot.  Composition is, of course, important when searching for inspiration in everyday, familiar subjects.

Nikon D5100. Edited in Camera Raw.

Steven’s Point, WI.  Nikon D5100. Edited in Camera Raw.

Find things around you that you might take for granted.  For me, for this shot, this mobile hanging from Grandma’s laundry line has just always been a part of the scenery.  It never really stood out to me and I never had a reason to look twice at it.  Don’t get put in a situation like I did for this shot.  Grandma recently moved out of the house that she grew up in, that she raised her own children in, that I’ve spent quite a number of summers at.  She’s 92 years young and lives on a farm by her lonesome.  She decided that she didn’t need or want to care for a huge amount of land and a dilapidated house that had more problems than there were solutions.  My last trip to the farm was a few months ago when I visited for a few days to help her pack.  It was a bittersweet experience for me.  I’m 100% supportive of my grandmother’s decision to move to an apartment – she’s still completely capable of taking care of herself – but on the other hand, I’m going to miss the farm house and the creaky floor boards and the crab apples and the tire swing hanging from the tallest tree in the yard.  She ended up selling the house to a neighboring farmer who currently rent out the actual farm land.

The lesson to take from that story is don’t take anything for granted.  That old boat at the end of the dock at your cabin, the slide at the playground of the park next to your house, wherever you think you’ve already captured your favorite memories – look harder.  Look again.

Nikon D5100.  No editing.

Steven’s Point, WI.  Nikon D5100. No editing.

Above is my ultimate “different perspective” photo.  It’s an old old old make-shift fence my grandfather put around Grandma’s little garden to keep the deer from eating everything.  Change your focus.  I have this picture focusing on the post and the background, too, but I like this one the best.  It’s such a small detail to focus on, something I typically wouldn’t look twice at.

That’s the whole point of photography, no matter what or where you’re shooting.  Always look at least twice!  Feel free to share your own stories about looking at things with a new perspective in the comments.

Get out there and shoot!

– Kate

Intro Part Deux

Hello and welcome. Now that Kate got all the important stuff out I am feeling much less pressured to write. If you haven’t read hers yet you should stop and scroll up down.

Now that that’s done, you did do it right? On with the show.

Why a blog? Why me? Well let me first say that this isn’t my first blog, not that any of my other blogs made it beyond six posts, but that’s not the point right? However, I will be working with Kate (again scroll down if you lied at the earlier question) which means I won’t be able to slack, procrastinate and all of those other maladies that seem to befall me. While I am a dreamer and a dreamer only, Kate is more of the dreamer/do-er combo of which I am insanely jealous over. So I know that this blog will make it beyond six posts and won’t be lost in wild of the internet. We have plans, we have dreams and we also have cake! The cake helps trust me. I am always trying to improve, learn and just understand more about photography, light, and all the other factors that go with it. The point of this blog for me and to share, show and learn, I was never very good at the “tell” part.

My photography style varies day to day. Its like my favorite saying about my age. “I am as young as I feel or as old as I look, depends on the day.” I sometimes love the basics, a black and white, and other times its heavily edited or HDR. You will also see a variance in the way I shoot the same subject. I’ve learned that though some of the photography “rules” are the same across cultures not all of them are and I often attempt to get that other look. I rarely shoot people whether models or street photography. You will see a lot of landscapes, nature, seasonal shots, temples and shrines (as I am living in Japan), and you will probably also see my dog Kouyou as she just moved to Japan this April.

I have a Canon 7D and HTC One. I usually shoot RAW but will use JPEG to get a few quick ones. I use photoshop when necessary but try not to do much outside of Camera RAW.

Sakura 2013

I picked two seasonal shots for my first post so you get a double dose.

Kyoto momiji (maple leaves) and Kinkakuji 2012

Also you will find that Kate is more adept at WordPress than I am and it will be noticeable as the blog goes on. In fact she is the one who set this all up! ❤

Don’t be afraid to push the button!

~Anne